AWS 에서 access key와 secret key를 받아야한다. 관련글은 다음의 중간에 나와있으니 참조.
[aws] aws cli로 s3 파일 삭제(console에서 파일삭제 실패 시-파일명 한글일 경우 실패함)
aws s3파일 중에 한글로 되어있는 경우 console 에서 지우는데 계속 실패하여 aws cli로 지우기로 했다. 오랜만에 aws cli를 사용하는데, 다음의 에러가 발생했다. $ aws zsh: /usr/local/bin/aws: bad interprete..
lemontia.tistory.com
build.gradle 에 다음을 추가한다.
여기서는 버전을 2.2.5로 정해주었다.
implementation group: 'org.springframework.cloud', name: 'spring-cloud-starter-aws', version: '2.2.5.RELEASE'
application.properties에 다음처럼 설정한다
...
# CloudFormation 은 없으므로 사용하지 않도록 false
cloud.aws.stack.auto=false
cloud.aws.region.static=ap-northeast-2
cloud.aws.credentials.access-key=[access-key 입력]
cloud.aws.credentials.secret-key=[secret-key 입력]
aws.s3.image.bucket=[기본 버킷주소 등록]
...
저 중에 cloud.aws.stack.auto=false 옵션을 넣지 않으면 다음 에러를 보게되며 앱실행에 실패한다.
그래서 설정에 꼭 추가한다
| Exception encountered during context initialization - cancelling refresh attempt: org.springframework.beans.factory.BeanCreationException: Error creating bean with name 'org.springframework.cloud.aws.core.env.ResourceIdResolver.BEAN_NAME': Invocation of init method failed; nested exception is org.springframework.beans.factory.UnsatisfiedDependencyException: Error creating bean with name 'stackResourceRegistryFactoryBean' defined in class path resource [org/springframework/cloud/aws/autoconfigure/context/ContextStackAutoConfiguration.class]: Unsatisfied dependency expressed through method 'stackResourceRegistryFactoryBean' parameter 1; nested exception is org.springframework.beans.factory.BeanCreationException: Error creating bean with name 'autoDetectingStackNameProvider' defined in class path resource [org/springframework/cloud/aws/autoconfigure/context/ContextStackAutoConfiguration.class]: Bean instantiation via factory method failed; nested exception is org.springframework.beans.BeanInstantiationException: Failed to instantiate [org.springframework.cloud.aws.core.env.stack.config.StackNameProvider]: Factory method 'autoDetectingStackNameProvider' threw exception; nested exception is java.lang.IllegalArgumentException: No valid instance id defined |
S3 설정을 등록한다
@Configuration
public class AmazonS3Config {
    @Value("${cloud.aws.credentials.access-key}")
    private String accessKey;

    @Value("${cloud.aws.credentials.secret-key}")
    private String secretKey;

    @Value("${cloud.aws.region.static}")
    private String region;

    @Bean
    @Primary
    public BasicAWSCredentials awsCredentialsProvider(){
        BasicAWSCredentials basicAWSCredentials = new BasicAWSCredentials(accessKey, secretKey);
        return basicAWSCredentials;
    }

    @Bean
    public AmazonS3 amazonS3() {
        AmazonS3 s3Builder = AmazonS3ClientBuilder.standard()
                .withRegion(region)
                .withCredentials(new AWSStaticCredentialsProvider(awsCredentialsProvider()))
                .build();
        return s3Builder;
    }
}
S3에 파일을 올릴 클래스를 생성한다
업로드시 파일을 public 권한으로 설정한다.
@Component
@RequiredArgsConstructor
public class UploadImageS3 {

    private final AmazonS3 amazonS3;

    @Value("${aws.s3.image.bucket}")
    private String bucket;


    /**
     * s3에 업로드
     */
    @Override
    public String upload(File uploadFile, String filePath, String saveFileName) {
        String fileName = filePath + "/" + saveFileName;
        amazonS3.putObject(new PutObjectRequest(bucket, fileName, uploadFile)
                .withCannedAcl(CannedAccessControlList.PublicRead)); // public 권한으로 설정

        return fileName;
    }
}
업로드할때 파일이 로컬에 없으면 다음과 같은 에러를 보게 된다
com.amazonaws.SdkClientException: Unable to calculate MD5 hash: [파일명] (No such file or directory)
...
그래서 파일을 생성한 뒤, S3에 업로드 완료하면 파일을 삭제할 것이다.
amazonS3 는 위에서 만든 config파일에서 생성한 Bean이다.
putObject 메서드를 이용하며, PutOjbjectRequest에다 버킷위치, 파일명, 업로드 파일을 파라미터에 넣어 객체생성한다.
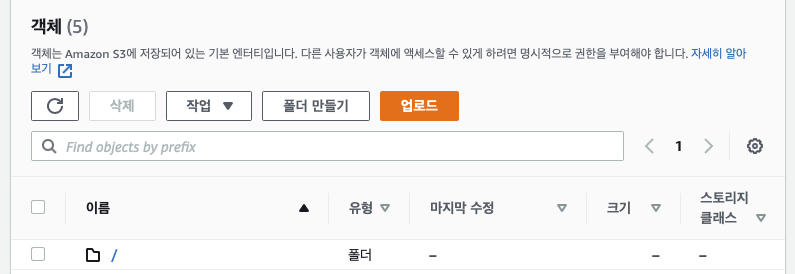
경로를 지정할 때 맨 앞에다가 "/"를 붙여서 /[경로]/[파일명] 형태로 업로드하게되면 "/"이름의 버킷이 생성되는데, 보기 좋지 않으니 지양하자.(아래처럼 "/"가 폴더가 된다)
이제 MultipartFile을 파일객체로 변환 => 저장한 후 객체를 리턴하게 한다.
Optional을 리턴하는 이유는 호출하는 곳에서 null를 하기 위함이다.
@Component
public class FileManager {
    // MultipartFile 을 file로 변형 후 로컬로 저장, 파일객체를 리턴
    public Optional<File> convertMultipartFileToFile(MultipartFile file) throws IOException {
        File convertFile = new File(file.getOriginalFilename());
        if(convertFile.createNewFile()) {
            try(FileOutputStream fos = new FileOutputStream(convertFile)) {
                fos.write(file.getBytes());
            }
            return Optional.of(convertFile);
        }
        return Optional.empty();
    }
}
위 메서드를 호출하는 부분을 다음과 같이 개발했다.
finally에서 업로드를 위해 생성했던 파일을 삭제한다
@Service
@RequiredArgsConstructor
public class ImageManagerService {
    private final FileManager fileManager;
    private final UploadImageS3 uploadImageS3;


    // 임시 파일 생성 & 업데이트 & 임시 파일 삭제
    public UploadFileDto createAndUploadFile(MultipartFile mf, String filePath) {
        long time = System.currentTimeMillis();
        String originalFilename = mf.getOriginalFilename();
        String saveFileName = String.format("%d_%s", time, originalFilename.replaceAll(" ", ""));

        // 파일 생성
        File uploadFile = null;
        try {
            Optional<File> uploadFileOpt = fileManager.convertMultipartFileToFile(mf);
            if(uploadFileOpt.isEmpty()) {
                throw new Exception("파일변환에 실패했습니다");
            }
            uploadFile = uploadFileOpt.get();

            // 파일 업로드
            String saveFilePath = uploadImage.upload(uploadFile, filePath, saveFileName);

            return UploadFileDto.create(originalFilename
                    ,  File.separator + saveFilePath);
        } catch (IOException e) {
            e.printStackTrace();
            throw new Exception("파일을 업로드 하던 중 에러가 발생했습니다");
        } finally {
            // 파일 삭제
            if(uploadFile != null){
                uploadFile.delete();
            }
        }
    }
...
위 메서드를 하나씩 뜯어보자
원본파일명 + currentTimeMillis() 에서 가져온 시간을 합쳐서 파일명을 생성했다. 중복된 파일명이 올라올 것을 염두해 파일명에 시간을 추가했다.
...
        long time = System.currentTimeMillis();
        String originalFilename = mf.getOriginalFilename();
        String saveFileName = String.format("%d_%s", time, originalFilename.replaceAll(" ", ""));
...
파일을 생성하고 생성실패 시 Exception을 리턴한다.
...
            Optional<File> uploadFileOpt = fileManager.convertMultipartFileToFile(mf);
            if(uploadFileOpt.isEmpty()) {
                throw new Exception("파일변환에 실패했습니다");
            }
            uploadFile = uploadFileOpt.get();
...
S3에 저장한다.
...
            // 파일 업로드
            String saveFilePath = uploadImage.upload(uploadFile, filePath, saveFileName);
...
파일명과 저장경로를 객체에 저장해 리턴한다.
리턴할때 File.separator 를 넣었는데, S3에 저장할 때 경로 맨 앞에 절대경로를 넣지 않았기 때문에 추가하여 절대경로로 표기한 것이다. 구현하려는 서비스에선 상대경로로 하고 싶다면 File.separator를 빼도 된다.
...
            return UploadFileDto.create(originalFilename
                    ,  File.separator + saveFilePath);
...
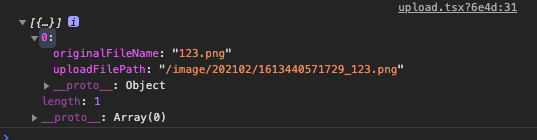
마지막으로 UploadFileDto 객체로 리턴하는데 구조를 보면 다음과 같다.
@Getter
public class UploadFileDto {
    // 원본파일 명
    private String originalFileName;
    // 업로드 파일경로
    private String uploadFilePath;

    private UploadFileDto(String originalFileName, String uploadFilePath) {
        this.originalFileName = originalFileName;
        this.uploadFilePath = uploadFilePath;
    }

    public static UploadFileDto create(String originalFileName, String uploadFilePath) {
        return new UploadFileDto(originalFileName, uploadFilePath);
    }
}
마지막으로 방금 만든 메서드(createAndUploadFile)를 호출할 메서드를 만든다.
클라이언트에서 FormData의 key를 image로 정했으며, 월별로 폴더를 만들어 저장할 것이기에 foldDiv 변수에 넣고 경로를 추가했다.
...
    private static final String formDataFileKey = "image";
    private static final String folderName = "image";
...

    /**
     * 이미지 업로드
     */
    public List<UploadFileDto> upload(MultipartHttpServletRequest request) {
        List<MultipartFile> images = request.getFiles(formDataFileKey);

        String foldDiv = LocalDate.now().format(DateTimeFormatter.ofPattern("yyyyMM"));
        String filePath = folderName + File.separator + foldDiv;


        List<UploadFileDto> fileNames = new ArrayList<>();

        for (MultipartFile mf : images) {
            // 파일 업로드 호출
            fileNames.add(createAndUploadFile(mf, filePath));
        }

        return fileNames;
    }
...
업로드를 시연하는거까지 하기엔 클라이언트 개발내용이 들어가야해서 여기에서 마무리하려 한다.
업로드 하고나서 json으로 다음과 같이 받았다.
아참, 그리고 실행 시 다음 에러가 발생하면 이전 글을 참조하자
com.amazonaws.SdkClientException: Failed to connect to service endpoint:
	at com.amazonaws.internal.EC2ResourceFetcher.doReadResource(EC2ResourceFetcher.java:100) ~[aws-java-sdk-core-1.11.792.jar:na]
	at com.amazonaws.internal.InstanceMetadataServiceResourceFetcher.getToken(InstanceMetadataServiceResourceFetcher.java:91) ~[aws-java-sdk-core-1.11.792.jar:na]
	at com.amazonaws.internal.InstanceMetadataServiceResourceFetcher.readResource(InstanceMetadataServiceResourceFetcher.java:69) ~[aws-java-sdk-core-1.11.792.jar:na]
at com.amazonaws.internal.EC2ResourceFetcher.readResource(EC2ResourceFetcher.java:66) ~[aws-java-sdk-core-1.11.792.jar:na][springboot] aws sdk 에러(SdkClientException: Failed to connect to service endpoint) 안띄우기
aws에 사용하는 애플리케이션을 연동해야할때 spring-cloud-start-aws 의 패키지를 쓰는 편인데, build.gradle을 설정하고 앱을 실행하면 다음 에러가 보인다. com.amazonaws.SdkClientException: Failed to conne..
lemontia.tistory.com
끝.


댓글