사용 패키지. bootstrap 은 디자인을 깔끔하게 보이게 하기위해 추가
npm install i18next --save
npm install react-i18next --save
npm install react-bootstrap --save
프로젝트는 다음과 같이 구성했다.
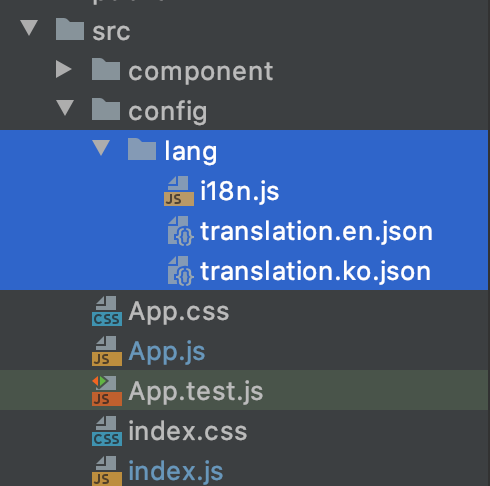
i18n.js 파일 생성 및 옵션설정
import i18n from "i18next"
import {initReactI18next} from "react-i18next";

import translationEn from './translation.en'
import translationKo from './translation.ko'

const resource =  {
    en: {
        translation: translationEn
    },
    ko: {
        translation: translationKo
    }
};

i18n
    .use(initReactI18next)  // passes i18n down to react-i18next
    .init({
        resources: resource,
        lng: "ko",
        fallbackLng: 'ko',
        // ns: ['translation'],
        // defaultNS: "translation",
        debug: true,
        keySeparator: false, // we do not use keys in form messages.welcome
        interpolation: {
            escapeValue: false // react already safes from xss
        }
    });

export default i18n;
다국어를 파일별로 관리하고, 그것을 resource에 넣는다. 이렇게하면 확정성이 용이할거라 생각했다.
translationXX 파일 내부는 다음과 같이 json으로 구성했다
영문
{
  "hello": "Hello !!"
}
한글
{
  "hello": "안녕"
}
위의 파일 내용을 resource 에 넣고, init 옵션 중 resources에 집어넣었다.
그리고 debug를 true 하기를 추천한다.(안나오면 왜 안나오는지 알 방법이 없다.)
기타 필요한 것은 모두 넣은거 같다.
그럼 이 파일을 index.js 파일에 추가해야 한다.
index.js 파일구성을 보면 다음과 같다.
MainComponent.jsx
import React, {Component} from "react";
import {withTranslation} from "react-i18next";
import i18next from "../config/lang/i18n";
import {Dropdown} from "react-bootstrap";

class MainComponent extends Component {
    ...
}
export default withTranslation()(MainComponent);
App.jsx
import React from 'react';
import logo from './logo.svg';
import './App.css';

import 'bootstrap/dist/css/bootstrap.min.css'
import MainComponent from "./component/MainComponent";

function App() {
  return (
    <div className="App">
        <MainComponent></MainComponent>
    </div>
  );
}

export default App;
이제 MainComponent에 내용을 추가한다.
우선 i18n을 적용하기 위해서는 withTranslation() 을 실행하고 export 해야한다.
...
export default withTranslation()(MainComponent);
다음은 공식페이지에서의 설명이다
| The withTranslation is a classic HOC (higher order component) and gets the t function and i18n instance inside your component via props. |
t와 i18n을 인스턴스 하기 위해 필요하다고 하니 꼭 넣어주자.
사용하는 방법은 다음과 같다
import React, {Component} from "react";
import {withTranslation} from "react-i18next";
import i18next from "../config/lang/i18n";

class MainComponent extends Component {
...
    render() {
        const {t} = this.props;
        return (
            <div>
                <p>
                    {t('hello')}
                </p>
                <p>
                    {t('helloTest')}
                </p>
            </div>
        )
    }
...
}
이렇게 하면 hello 라고 등록된 값을 가져온다.
등록된 message가 없으면 console 창에 다음과 같은 문구가 뜨고, 변수명을 그대로 노출한다.
참고로 설정에서 debug 모드를 true로 해두지 않으면 콘솔창에 경고문을 출력하지 않는다.
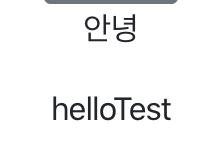
# 브라우저 콘솔창을 보면 다음 문구가 뜬다
i18next::translator: missingKey ko translation helloTest helloTest
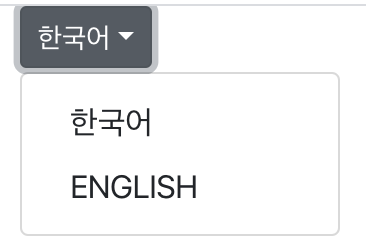
# bootstrap 의 DropDown 을 사용하여 변경해보기
이번에는 어느 사이트에서나 본듯한 언어변경을 시도해보자. 여기서는 DropDown을 사용하여 변경하도록 한다.
그리고 변경되면 DropDown 의 텍스트도 바뀌도록 한다
import React, {Component} from "react";
import {withTranslation} from "react-i18next";
import i18next from "../config/lang/i18n";
import {Dropdown} from "react-bootstrap";

class MainComponent extends Component {
    state = {
        languageTitle: "한국어"
    }

    changeLanguage = (e) => {
        // 언어변경
        i18next.changeLanguage(e.split(',')[0]);

        // 이름변경
        this.setState({
            "languageTitle": e.split(',')[1]
        })
    }

    render() {
        const {t} = this.props;
        return (
            <div>
                <Dropdown onSelect={this.changeLanguage}>
                    <Dropdown.Toggle variant="secondary" size="sm">
                        {this.state.languageTitle}
                    </Dropdown.Toggle>
                    <Dropdown.Menu>
                        <Dropdown.Item eventKey={["ko", "한국어"]}>한국어</Dropdown.Item>
                        <Dropdown.Item eventKey={["en", "ENGLISH"]}>ENGLISH</Dropdown.Item>
                    </Dropdown.Menu>
                </Dropdown>

                <p>
                    {t('hello')}
                </p>
            </div>
        )
    }
}

export default withTranslation()(MainComponent);
코드를 보면 title 부분을 state.languageTitle 을 보게 했다. 그래야 키를 클릭했을때 텍스트를 변경할 수 있기 때문이다.
hadler는 changeLanguage 에서 하도록 했는데 자세히 보면 문자열을 잘라서 쓴다. eventKey를 사용할때 parameter를 가변적으로 전달할 수 있게끔 하면 좋겠는데 아쉽게 찾지 못했다. 제목역시 직접 파라미터로 받을 것이므로 eventKey 에 직접 등록한다.
    changeLanguage = (e) => {
        // 언어변경
        i18next.changeLanguage(e.split(',')[0]);

        // 이름변경
        this.setState({
            "languageTitle": e.split(',')[1]
        })
    }
이제 화면을 보면 다음과 같이 뜬다. DropDown 의 값을 각각 클릭해 보자.


코드는 github에 올려두었다.
https://github.com/lemontia/sample-react-i18next
lemontia/sample-react-i18next
Contribute to lemontia/sample-react-i18next development by creating an account on GitHub.
github.com
끝.
참조:
공식페이지:
https://react.i18next.com/getting-started
Getting started
react.i18next.com
react-i18next 적용해보기 (다국어 처리)
react-i18next 를 이용하려다 여러 글들을 봤는데 너무 어려워서 저처럼 초보도 알아볼 수 있게 정리를 해봤습니다. app.js import React, { Component } from "react"; import { withTranslation, Trans } from "..
99geo.tistory.com
https://github.com/i18next/react-i18next/issues/625
Strings not being translated · Issue #625 · i18next/react-i18next
I have a pretty complex react-native app that wasn't designed with i18n in mind and I need to localize it to a couple of languages. I've tried using i18next+react-i18next to accomplish the ...
github.com
국제화 라이브러리 사용하기
i18next? 라고 i18next 홈페이지에 설명이 되어있습니다. 웹 프로젝트에서 react-i18next로 다국어 적용을 해본 경험으로 react-i18next의 사용법을 설명하려합니다. react-i18next 라이브러리 사용법 프로젝트에 yarn 이나 npm으로 react-i18next 패키지를 설치합니다. 설치 전 필요한 패키지를 미리 설치...
velog.io
https://sg-choi.tistory.com/241
[React] i18next
들어가기 전 다국어 처리를 위해 i18next와 react-i18next 모듈을 활용 모듈 설치 # yarn으로 설치 yarn add react-i18next i18next # npm으로 설치 npm install react-i18next i18next --save translation.en.jso..
sg-choi.tistory.com
'공부 > 프로그래밍' 카테고리의 다른 글
| [react + next.js] 페이지 이동(push, href 차이) (0) | 2020.03.19 |
|---|---|
| [spring] 테스트 중 Unable to initialize 'javax.el.ExpressionFactory' 해결하기 - validator 2.0.0(JSR-380) 적용 (0) | 2020.03.17 |
| [springboot, oauth2] 라인(LINE) 소셜 로그인 연동(jwt, jwkSetUri) (0) | 2020.03.09 |
| [spring, axios] Content-Type 을 json 또는 application/x-www-form-urlencoded 로 전송 테스트 (0) | 2020.03.04 |
| [dbms] where에 In 절 사용 시 알아두면 좋은 것 (0) | 2020.02.27 |


댓글