이전 포스팅에 이어 자원서버 구축하는 과정이다.
Authorization Server(인증서버) 구축하기
https://lemontia.tistory.com/927
[springboot, oauth] Authorization Server(인증서버) 구축하기
OAuth2 역할은 크게 4가지로 분류된다 - Resource Owner - Authorization Server - Resource Server - Client :: Resource Owner는 유저를 뜻한다. 내가 만든 서비스를 이용하고자 하는 고객을 의미한다 :: Author..
lemontia.tistory.com
지난번 포스팅에서는 access_token을 받을 수 있는 서버 구축의 글이었다면, 이번에는 서버 접근 제한 권한 및 토큰을 이용해 접근하는 것에 관련된 포스팅이다.
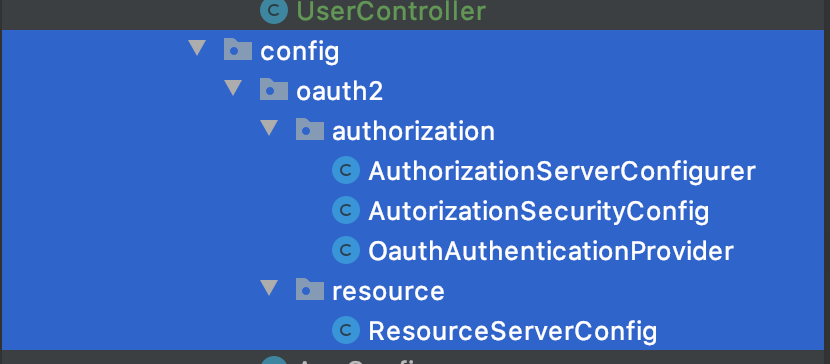
우선 지난 포스팅에 비해 구조를 조금 바꿨다. Authorization 과 Resource 의 설정을 분리하기 위해서 한 것일뿐 큰 의미는 없다.
그리고 지난번엔 User에게 권한(role)을 부여하지 않았지만 이번엔 부여하도록 하자
TestUser.class 를 다음과 같이 수정했다.
@Getter
public class TestUser {

    private String username = "user";
    private String password = "pass";
    private List<String> roles = new ArrayList<>();

    public TestUser() {
        roles.add("ROLE_USER");
    }

    public Collection<? extends GrantedAuthority> getAuthorities() {
        return this.roles.stream().map(SimpleGrantedAuthority::new).collect(Collectors.toList());
    }
}
여기서는 ROLE_USER 권한을 주었다. 앞에 'ROLE_' 을 준 이유는 후 설정에 영향을 미치기 때문이다.
특정 경로 접근을 role에 따라 분리하려 설정할때 hasRole('USER') 을 사용하는데, 이렇게 설정할때 ROLE_ 가 자동으로 붙는다.(아래 설정참조)
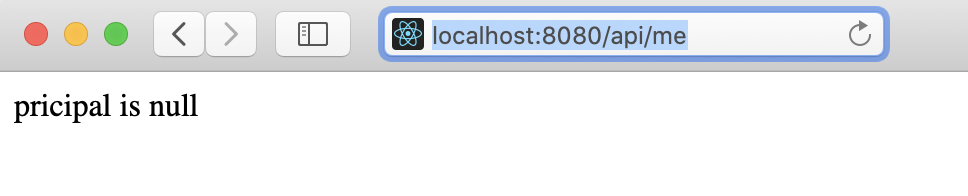
다만 현재상태에서는 아직 권한체크를 하는 곳이 없다. 그래서 다음과 같이 컨트롤러를 생성하고 호출해봤다.
@RestController
public class UserController {

    @GetMapping("/api/me")
    public String apiMe(Principal principal) {
        System.out.println("principal = " + principal);

        if(principal == null) {
            return "pricipal is null";
        }
        return principal.getName();
    }
}
이번에 Resource Server 를 설정한다.
/api/ 를 통한 url은 모두 USER라는 권한이 있도록 설정했다.
@Configuration
@EnableResourceServer
public class ResourceServerConfig extends ResourceServerConfigurerAdapter {
@Override
public void configure(HttpSecurity http) throws Exception {
http.authorizeRequests()
.antMatchers("/api/**").access("hasRole('USER')")
.anyRequest().authenticated();
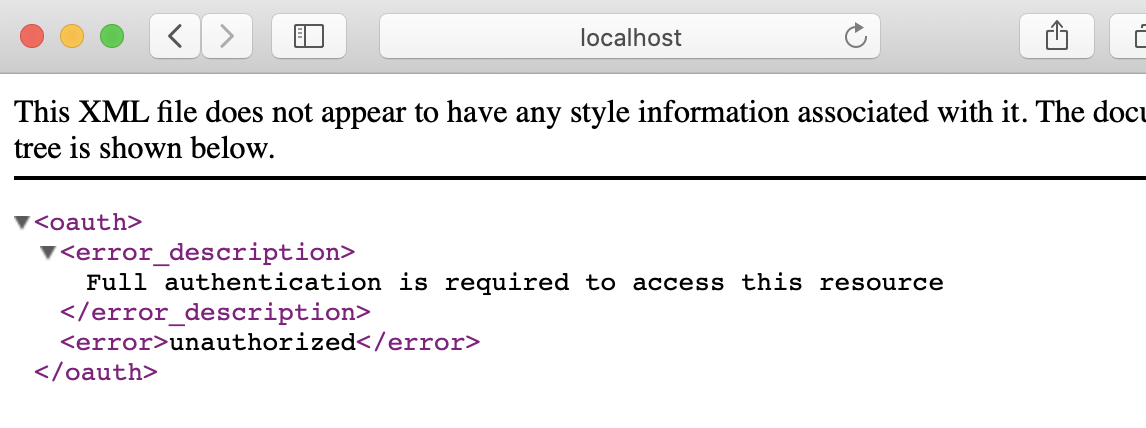
}
}이제 URL로 접근하면 다음과같이 접근 거부 화면을 볼 수 있다.
테스트 시작
이제 각각의 테스트를 해보려 한다.
우선 access_token을 받고 /token/check_token 을 호출해 맞는지 확인하는 테스트를 작성한다.
@SpringBootTest
@AutoConfigureMockMvc
class OauthControllerTest {

    @Autowired
    MockMvc mockMvc;

    @Autowired
    ObjectMapper objectMapper;


    @Test
    @DisplayName("oauth token 테스트")
    void oauthTokenTest() throws Exception {
        // given
        String clientId = "testClientId";
        String secret = "testSecret";
        String username = "user";
        MultiValueMap params = new LinkedMultiValueMap();
        params.add("grant_type", "password");
        params.add("username", username);
        params.add("password", "pass");


        // when
        MvcResult result = mockMvc.perform(post("/oauth/token")
                .params(params)
                .with(httpBasic(clientId, secret))
                .accept(MediaType.APPLICATION_JSON_VALUE)
        ).andReturn();

        System.out.println("result = " + result);
        String contentAsString = result.getResponse().getContentAsString();
        System.out.println("body = " + contentAsString);

        // then
        Assertions.assertThat(contentAsString).contains("access_token").contains("refresh_token");

        Map map = objectMapper.readValue(contentAsString, Map.class);
        System.out.println("map = " + map);


        // token 검토
        String accessToken = (String) map.get("access_token");
        String url = "/oauth/check_token?token=" + accessToken;

        MvcResult mvcResultApi = mockMvc.perform(get(url)).andReturn();

        System.out.println("mvcResultApi = " + mvcResultApi);
        System.out.println("mvcResultApi.getResponse().getContentAsString() = " + mvcResultApi.getResponse().getContentAsString());
        String checkTokenStr = mvcResultApi.getResponse().getContentAsString();

        Map checkTokenMap = objectMapper.readValue(checkTokenStr, Map.class);
        boolean active = (boolean) checkTokenMap.get("active");;
        String user_name = (String) checkTokenMap.get("user_name");
        String client_id = (String) checkTokenMap.get("client_id");

        Assertions.assertThat(active).isEqualTo(true);
        Assertions.assertThat(user_name).isEqualTo(username);
        Assertions.assertThat(client_id).isEqualTo(clientId);
    }
}
테스트는 성공으로 끝났고 다음의 로그를 남겼다.
mvcResultApi = org.springframework.test.web.servlet.DefaultMvcResult@63f16350
mvcResultApi.getResponse().getContentAsString() = {"active":true,"exp":1585500335,"user_name":"user","authorities":["ROLE_USER"],"client_id":"testClientId","scope":["read","write"]}
그럼 이제 access_token 이 있을때와 없을때를 각각 테스트작성해 보았다.
@SpringBootTest
@AutoConfigureMockMvc
class UserControllerTest {
    @Autowired
    MockMvc mockMvc;

    @Autowired
    ObjectMapper objectMapper;

    @Test
    @DisplayName("access_token 없이 접근하기")
    void noAccessTokenTest() throws Exception {
        String url = "/api/me";

        MvcResult mvcResult = mockMvc.perform(get(url)
                .accept(MediaType.APPLICATION_JSON)
        ).andReturn();

        Assertions.assertThat(mvcResult.getResponse().getStatus())
                .isEqualTo(401);
        Assertions.assertThat(mvcResult.getResponse().getContentAsString())
                .contains("unauthorized");
    }
}
로그를 보면 다음과 같은 텍스트가 찍혀있다.
org.springframework.security.access.AccessDeniedException: Access is denied
	at org.springframework.security.access.vote.AffirmativeBased.decide(AffirmativeBased.java:84) ~[spring-security-core-5.2.2.RELEASE.jar:5.2.2.RELEASE]
	at org.springframework.security.access.intercept.AbstractSecurityInterceptor.beforeInvocation(AbstractSecurityInterceptor.java:233) ~[spring-security-core-5.2.2.RELEASE.jar:5.2.2.RELEASE]
테스트는 성공했다(401 에러를 성공으로 두었기 때문).
이번에는 access_token을 발급받고 토큰으로 /api/me 에 접근해보는 테스트를 작성했다.
@SpringBootTest
@AutoConfigureMockMvc
class UserControllerTest {
    @Autowired
    MockMvc mockMvc;

    @Autowired
    ObjectMapper objectMapper;

    @Test
    @DisplayName("access_token 으로 접근하기")
    void accessTokenTest() throws Exception {
        // access_token 획득
        String clientId = "testClientId";
        String secret = "testSecret";
        String credentials = clientId+":"+secret;
        String encodedCredentials = new String(Base64.encode(credentials.getBytes()));

        TestUser testUser = new TestUser();

        MultiValueMap<String, String> params = new LinkedMultiValueMap<>();
        params.add("username", testUser.getUsername());
        params.add("password", testUser.getPassword());
        params.add("grant_type", "password");

        MvcResult mvcResult = mockMvc.perform(post("/oauth/token")
                .params(params)
                .accept(MediaType.APPLICATION_FORM_URLENCODED)
                .header("Authorization", "Basic " + encodedCredentials)
        ).andReturn();

        String response = mvcResult.getResponse().getContentAsString();
        Assertions.assertThat(response).contains("access_token");
        Assertions.assertThat(response).contains("read write");

        Map map = objectMapper.readValue(response, Map.class);
        System.out.println("map = " + map);


        // token 으로 접근

        String accessToken = (String) map.get("access_token");
        String url = "/api/me";

        MvcResult mvcResultApi = mockMvc.perform(get(url)
                .accept(MediaType.APPLICATION_JSON)
                .header("Authorization", "bearer " + accessToken)
        ).andReturn();

        System.out.println("mvcResultApi = " + mvcResultApi);
        System.out.println("mvcResultApi.getResponse().getContentAsString() = " + mvcResultApi.getResponse().getContentAsString());
        String responseString = mvcResultApi.getResponse().getContentAsString();

        Assertions.assertThat(mvcResultApi.getResponse().getStatus()).isEqualTo(200);
        Assertions.assertThat(responseString).isEqualTo(testUser.getUsername());
    }
}
마지막 로그에 user가 찍혔음을 확인할 수 있었다.
mvcResultApi = org.springframework.test.web.servlet.DefaultMvcResult@60493524
mvcResultApi.getResponse().getContentAsString() = user
이로써 Authorization Server 와 Resource Server 가 구축완료 되었다.
자세한 것은 Github에 올려두었으니 참조하면 되겠다.
끝.
github 주소:
https://github.com/lemontia/spring_oauth-authorization_server-noDB
lemontia/spring_oauth-authorization_server-noDB
Contribute to lemontia/spring_oauth-authorization_server-noDB development by creating an account on GitHub.
github.com
'공부 > 프로그래밍' 카테고리의 다른 글
| [DBMS] 트랜잭션 격리수준 (isolation level) (0) | 2020.04.03 |
|---|---|
| [querydsl, mysql] DATE_FORMAT 등 이용해 groupby 사용하기 (0) | 2020.04.02 |
| [springboot, oauth] Authorization Server(인증서버) 구축하기 (2) | 2020.03.21 |
| [react + next.js] 페이지 이동(push, href 차이) (0) | 2020.03.19 |
| [spring] 테스트 중 Unable to initialize 'javax.el.ExpressionFactory' 해결하기 - validator 2.0.0(JSR-380) 적용 (0) | 2020.03.17 |


댓글